
Download The

Seed bed preparation
In order to provide seed with best chance of successful establishment, it is vital that the paddock and seedbed are in a desirable state. This includes being free from weeds, having manageable levels of stubble, a fine enough tilth and importantly an adequate level of moisture
Weed control
Keeping paddocks free from weeds helps to maximise soil moisture and reduce competition with both emerging seedlings and later in the season, with established plants. Applications of products such as Atrazine and Metolachlor can be made prior planting in the fallow period for residual control of grass and broadleaf weeds. A “top up” application of these products is then commonly applied together with glyphosate at planting (but prior to emergence) to help ensure a weed free start to the season.
Planting machinery and stubble loads
Knowing the tolerance of planting machinery to stubble loads left behind by the previous crop is important to ensure planters can successfully place the seed at the desired depth, with the desired seed spacing and without producing obstacles that negatively impact on seedling emergence. Stubble implications are described in more detail later in this guide.
Seed soil contact
As with all seeds, grain sorghum seed requires good seed-soil contact to ensure thrifty and healthy seedling emergence. By ensuring that the tilth of the seedbed is not too coarse seed-soil contact will be maximised, giving seeds the best chance of accessing the required moisture and nutrients for successful germination.
Soil moisture
Perhaps an obvious factor in having a suitable seedbed for planting is the level of soil moisture present. Problems from planting when soil moisture is too dry are well known, with seeds failing to germinate completely or germinating and emerging but dying as moisture runs out. It is however also important to note potential negative impacts arising from planting when soil moisture is too great which often occurs when sowing begins too soon after a rainfall or flooding event.
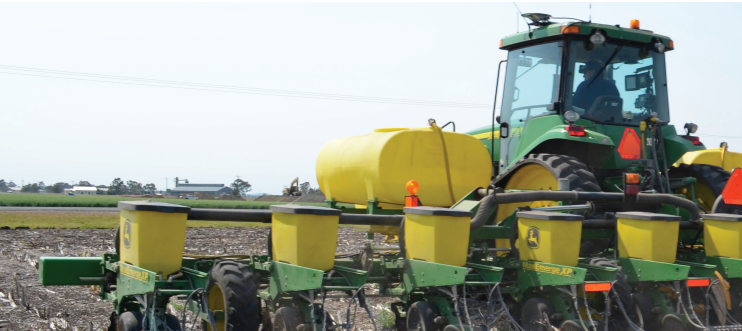
Planter tips
In the lead up to planting it is important that time is dedicated to checking over and performing any maintenance required on planters.
After all, these are the implements we heavily rely on to provide us with our desired plant populations. Having machinery such as planters operating to their best ability is vital. To assist with pre-season planter inspections and maintenance please take the time to read the ‘Ten Planter Tune Up Tips’ provided courtesy of Precision Planting USA.
Planter tune up tips
Courtesy of Precision Planting, USA
Ten things to check before planting season:


For more information and an in depth video on
this topic visit: www.precisionplanting.com
GRAIN SORGHUM HYBRIDS
Soil temperature
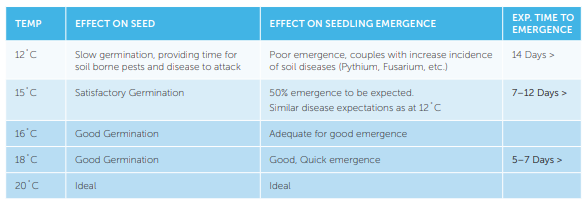
Knowing the temperature of the soil in the planting zone and planting at the correct time is vital to achieving the required plant stand.
The correct method of measuring soil temperature is by calculating the daily average soil temperature – that is, adding the maximum and minimum soil temperatures of the day and dividing by two.
As many don’t have access to on farm, or nearby weather stations that regularly measure soil temperature, the more well known method of taking the 8am soil temperature with a soil thermometer is often carried out.
As the soil is often at its coldest at this time of the day this is an acceptable method of measuring soil temperature as it will give an indication of the lowest soil temperature of the day.
It is important that soil temperatures are taken and recorded over an extended period in the lead up to planting to assess whether the temperature is trending higher or lower.
In order to make the decision that soil temperature requirements have been met, the recorded temperatures must be rising over the period of assessment and weather forecasts should suggest this is to continue.
This graph demonstrates that by planting early when average soil temperatures are just two degrees cooler at 14°C, emergence after a period of two weeks can be at least 20% lower than waiting until the ideal soil temperature of 16°C.
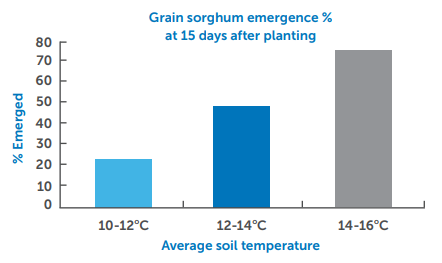
Effects of slow seedling emergence
The optimum soil temperature for planting grain sorghum is 16°C and rising. Planting when temperatures are lower than this will lead to slower seedling emergence and can increase the risk of seedling mortality. When the emergence of sorghum plants is slowed they are more susceptible to attack from insects and other pests such as mice as well as disease infection.
Row spacing
The choice of row configuration is determined by using long term experience of local conditions and productivity. Factors to consider when choosing a row configuration include:
- Long term average yields
- Long term mean rainfall and temperature data as well as forecasts
- Soil water holding capacity
- Soil type/s
- Level of soil moisture at planting and outlook
There are four common choices of row configuration for grain sorghum – solid, super wide, single skip or double skip. Examples of these can be seen below. On top of these configurations there are often differences in row spacing ranging from 75cm (30”), 100cm (40”), 150cm (60”) or 200cm (80”).
Higher yielding, more reliable environments will often use 75cm or 100cm spacing on a solid row configuration.
In areas where yield potential averages less than 3t/ha the choice is often made to widen row configurations to double or single skip. Some of these areas may also find super wide configurations on a wider row spacing of 150cm or 200cm beneficial to protect yield.
The main advantage of skip row configurations is that they can increase the reliability of sorghum crops in areas where harsh conditions may routinely impact on yield. Wider row configurations can improve productivity in these areas by lifting lower yield limits however in seasons where yield potential is above average they also limit top end yield when compared to configurations such as a solid plant.
It is therefore important factors such as long term average yield are considered when choosing a row configuration.
Also bear in mind that weed pressure within the ‘skip’ can also be higher due to a lack of crop competition.
It is important when planting these configurations that the desired plant population remains the same. In other words, the seeds that would have been sown in the skipped rows are evenly distributed into the planted rows.
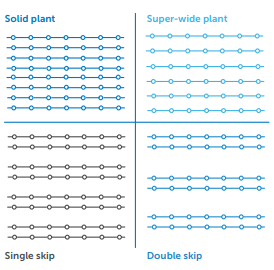
Examples of grain sorghum row configurations.
Moisture implications
Soil moisture whether too wet or too dry can have implications on plant establishment and crop health.
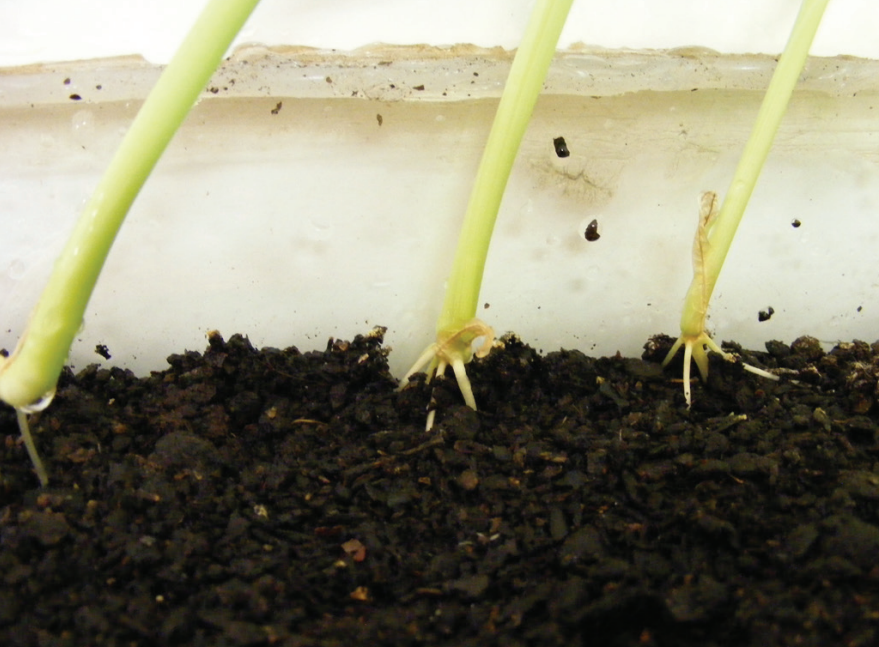
Often when conditions are marginal and the opportunities to plant are running out, sorghum has been planted dry with the hope that a rainfall event will provide enough moisture for the seed to germinate and follow up rain will then keep the crop growing. In dry sowing situations it is vital the soil is completely dry to avoid a proportion of seeds in areas of minimal moisture germinating and causing an uneven establishment. Sorghum seed has a very low water potential, causing it to have a very high pull on any moisture that may be in the immediate seed zone. Therefore if planting dry care must be taken to ensure that the seed is unable to imbibe and release important germination enzymes. Once these enzymes have been released and there is insufficient moisture remaining to physically germinate the seed it will die, even though visually it could still appear viable. The other extreme is planting when conditions are too wet. Planting when soils are too wet can lead to smearing the sidewalls of the planting trench forcing plant roots to grow directly down rather than also spreading outwards. When this occurs the roots potentially miss picking up top soil moisture and applied fertilizer bands. Although this may not be an issue for mobile nutrients it could mean that expensive immobile nutrients are not accessed and utilized at all. Sorghum relies heavily on stored nutrients found in the top 10cm of the soil profile however if compaction has led to fibrous roots not being able to access this area, the crop could very well suffer lower yields due to nutrient deficiencies encountered during the first 30 days following planting. A further point to consider is crops that lack roots in the top profile of soil will be prevented from making use of smaller falls of rain that are not great enough to drain down to lower roots.
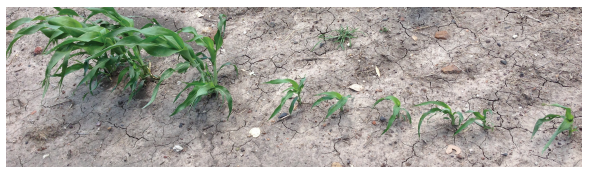
Pictured above are the effects of late germination which can occur after attempting to dry sow into soils not completely dry.
Planting depth
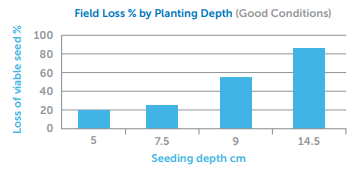
For obvious reasons, when planting it is important to place the seed into good levels of moisture. Care must however be taken to ensure seed is placed neither too deep nor too shallow in the profile as both situations can have negative impacts on crop establishment. Research has shown the ideal depth for planting grain sorghum is 3-5cm. Planting the seed deeper than this can lead to problems such as slowing the rate of emergence which may result in an increased risk of insect and disease losses. Additionally, placing the seed too deep may result in the coleoptiles being unable reach the soil surface. Losses incurred as planting depth increases can be seen in graph and table below. Problems can also be encountered when planting the seed too shallow. These problems regularly appear when planting into good moisture profiles as often the thought is to just ‘scratch’ the seed in as the moisture is right at the surface. When planting at levels shallower than 3cm, emergence can be dramatically affected by rapid seed bed drying from factors such as warm, windy weather and also by secondary roots forming above the soil surface causing poor plant stability, likely leading to lodging.
For obvious reasons, when planting it is important to place the seed into good levels of moisture. Care must however be taken to ensure seed is placed neither too deep nor too shallow in the profile as both situations can have negative impacts on crop establishment. Research has shown the ideal depth for planting grain sorghum is 3-5cm. Planting the seed deeper than this can lead to problems such as slowing the rate of emergence which may result in an increased risk of insect and disease losses. Additionally, placing the seed too deep may result in the coleoptiles being unable reach the soil surface. Losses incurred as planting depth increases can be seen in graph and table below. Problems can also be encountered when planting the seed too shallow. These problems regularly appear when planting into good moisture profiles as often the thought is to just ‘scratch’ the seed in as the moisture is right at the surface. When planting at levels shallower than 3cm, emergence can be dramatically affected by rapid seed bed drying from factors such as warm, windy weather and also by secondary roots forming above the soil surface causing poor plant stability, likely leading to lodging.
Plant population
Plant populations across Australia’s sorghum growing regions vary dramatically. Many factors contribute to deciding on the required plant population for any given season.
The same consideration for choosing row spacing applies to planting populations, including:
- Long term average yields
- Long term mean rainfall and temperature data as well as forecasts
- Soil water holding capacity
- Soil type/s
- Level of soil moisture at planting and seasonal outlook
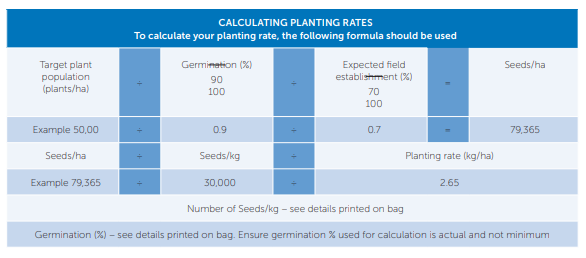
The recommended populations in the top table below are intended as a guide and will not always be correct for every season. Other considerations to bear in mind when choosing a plant population are genetic factors such as tillering ability and how this can be manipulated by altering plant population. The importance of this is highlighted in the Seed Spacing’ section later in this document.
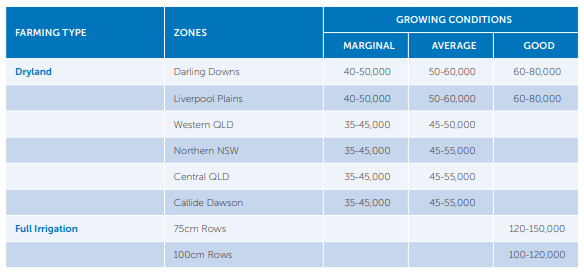
Recommended plant populations by region
Bag tag
When processing, Pacific Seeds attaches stickers to each bag with information regarding the seed contained inside. Please be aware that when reading the germination percentages listed on these stickers only the minimum germination percentage is displayed.
This is NOT the actual germination percentage of the seed in that bag and is NOT the figure to be used when calculating your sowing rate. In order to get the actual germination percentage of your seed, please send a text message containing the batch number listed on the bag sticker to 0409 668 671.
Within a couple of minutes the actual germination information will be will be sent back as a text message.
Please use the information below as a guide
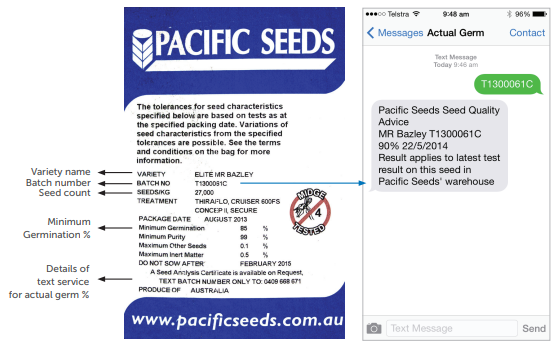
Simply text the batch number (and only that number to avoid confusing the automated reply) to: 0409 668 671
Safe fertiliser rates with seed
Fertiliser toxicity can be a major problem with seedling establishment. Contributing factors to fertiliser damage include opener type, the release of ammonia and the salt index of the fertiliser being used.
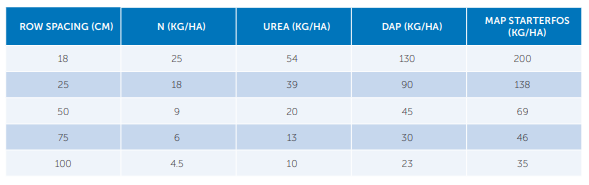
A narrow opener or disc planter can significantly increase the concentration of fertiliser in the immediate seed zone. If planting with minimal moisture, fertiliser with a high salt index can have an osmotic effect on the seed, drawing moisture away from it and into fertiliser granules which have a higher water potential than seed. Higher salt index fertilisers also have more potential of ammonia desiccation or burn with nitrogen and potassium based products generally being of a higher risk than phosphorus based products. To reduce the risk of fertiliser burn it is important that safe fertiliser rates are known and followed. The table below shows common row spacings and maximum rates of common granular fertilisers that can be safely applied with grain sorghum seed at planting.
Safe fertiliser rates with grain sorghum
Further considerations for safe fertiliser application:
- Rates should be reduced by 50% for very sandy soil sand may be increased by 30% for heavy textured soils or where soil moisture conditions at planting are excellent.
- Rates should be reduced by 50% when planting equipment with narrow slit openers are used (the fertiliser concentration is increased around the seed).
- Rates may be increased by 50% when airseeders are used operating at high pressures with wide openers. Air seeders spread the fertiliser bands when operating at high pressures reducing the fertiliser concentration around the seed.
- For more nutrient specific information regarding Grain Sorghum Nutrition please consult Pacific Seeds Cropping Companion.
Optimal seed spacing
There is a common thought with grain sorghum that the plant will compensate for any gaps in the plant stand using its ability to tiller. Although the ability to tiller is often a very desirable trait which can help increase yield by taking advantage of favourable conditions, is it possible for tillering alone to make up for any missing or unthrifty plants? Research into grain sorghum seed placement assessed four different seed placements and how the various seed placements impacted on final yield. The four placements were assuming an established plant population of 50,000/ha and were described as:
• Ideal placement
• Doubles
• Three in – one out
• Two in – two out
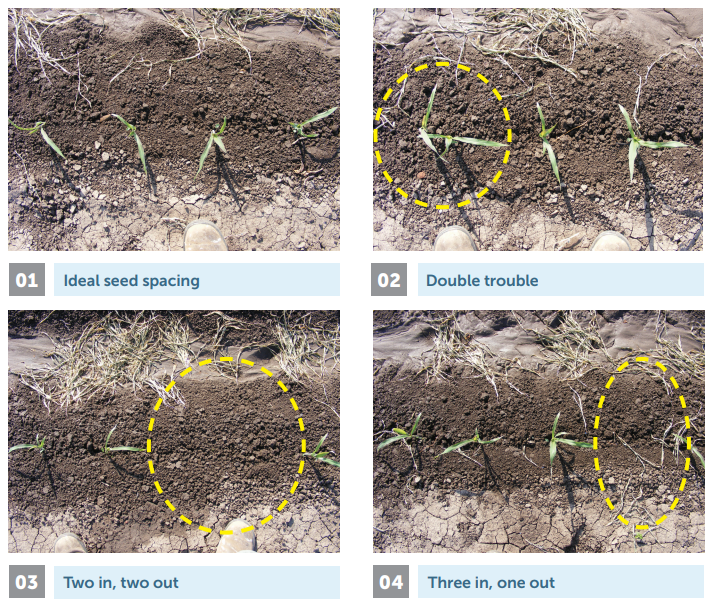
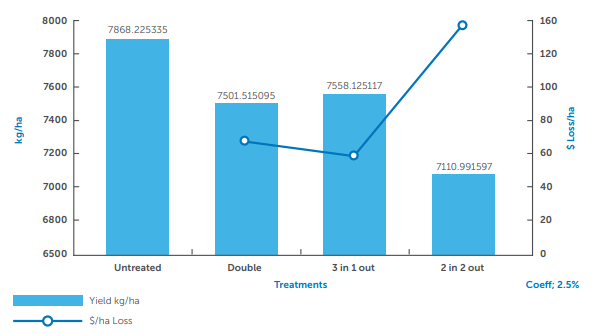
The graph below shows the results of the trial in both final yield as well as the impact in dollars per hectare of having unevenly placed seed.
In summary, having ‘doubles’ was just as bad as having three well placed seeds and the fourth seed missing completely. This can be explained due to the fact that one of the two seedlings in the ‘double’ will become dominant with the other remaining unthrifty and going on to be of very little use to the crop, therefore only three plants actually contribute to final yield.
The impact of the ‘two in – two out’ placement was dramatically less and lead to a loss of $150/ha as the two missing plants could not be accounted for by the tillering ability of the remaining two plants.
It is clear that although the ability of grain sorghum to tiller has its advantages, tillers can only do so much and even under the most favourable conditions they cannot take the place of a missing neighbouring plant.
It is therefore essential that all care is taken to ensure even plant spacing for each grower’s chosen plant population and row configuration.
Please see the seed spacing chart on the back of this document to assist in calculating optimal seed spacing. It is often thought that using a precision planter means that all of the seeds planted will automatically be placed in the precise position however this is not the case.
Common causes of misplaced seed are incorrect speed and meter related problems such as vacuum pressure and seed singulation. Tractor and planter speed is the number one cause of misplaced seed. Manufacturers of precision planters provide specific guidelines for speed as their seed tubes are designed so that a free falling seed (combined with travelling at the defined forward momentum eg. 8km/h) will follow the curvature of the seed tube without bouncing off the inner walls of the tube.
Vacuum pressure and seed singulation are the main meter related causes of poorly placed seed. Too much vacuum may prevent individual seed singulation and can result in doubles; too little vacuum and gaps in the plant stand could occur.
Down force pressure
A common problem at planting time is deciding which down force setting should be applied for that specific situation. Although it may not always be obvious to the naked eye, all paddocks have variations such as soil type, soil density and soil moisture which make it impossible for one downforce setting to be suitable for a whole paddock. Unless you have purchased technology such as automatic downforce, care must be taken in selecting the most appropriate setting for the field and in some situations be prepared to adjust throughout the planting process as necessary.
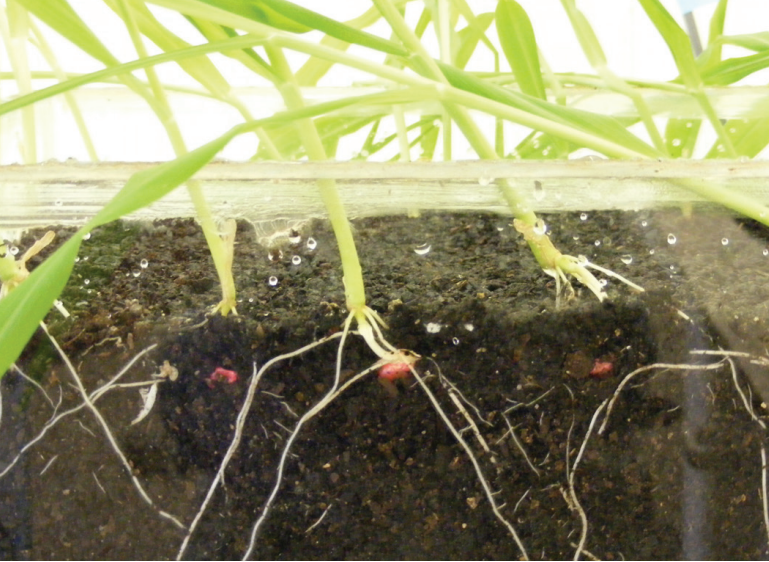
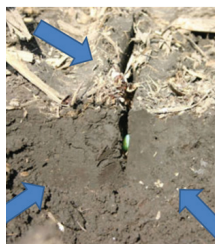
Common compaction problems seen at planting are a result of excessive mechanical load from gauge and press wheels being placed upon wet soils. As the load is exerted on the soil, the moisture is squeezed out of the soil pores causing a ‘brick’ like structure to form in the seed zone and/or disc openers to smear the walls of the seed trench. As can be seen below, these hard barriers then prevent roots from penetrating further into the soil profile to access moisture and nutrients increasing seedling mortality and reducing overall yield potential.
The well known “Kinze crack” occurs when trying to squeeze two wet, already compacted surfaces back together. When this occurs two things can happen; if moisture is adequate the seed will germinate and begin to grow however its roots will struggle to correctly establish as there is a hard ‘V’ or ‘W’ shaped groove which they cannot penetrate. In this situation it is not uncommon to see roots such as in the image to the right growing along the seed trench rather than downwards further into the soil profile.
The second scenario is that dry and often windy conditions cause the seed zone to rapidly dry leading to poor germination and overall plant stand. When adequate moisture does occur for germination, the seedling often then runs into the first problem described where the compacted seed trench prevents root penetration.
A huge emphasis is rightly placed on soil compaction caused by machinery wheel tracks however careful consideration must also be placed on the effect of compaction caused by the gauge wheels and press wheels of planter units. An interesting, and often not considered point worth noting is that even the changing weight of seed boxes as they are filled and emptied during planting can be a significant contributor to excessive in-row compaction.
The impact of too much down force pressure
Above: Soil compaction leading to roots running along the seed trench rather than through it
Stubble
Standing stubble in zero till systems offer numerous benefits to emerging seedlings such as increasing water infiltration, soil temperature control and protection of seedlings against wind and sandblasting.
However when stubble falls over it can cause considerable problems with planting.
Without adequate row cleaners, disc planters can pin the stubble in the seed trench (hair pinning) leading to problems maintaining a consistent planting depth and also causing problems when trying to close the seed trench.
Hair pinning becomes more of a problem when discs become worn and are not adjusted correctly. In these situations discs are not angled adequately enough to cleanly cut stalks and instead stubble is pushed downwards and under the planting unit.
Please note that shallow planting is also known to exacerbate the problem. When planting into heavy crop residues and where offsetting planting rows using guidance is not possible, it is imperative that some form of row cleaner is used to prevent stubble negatively impacting on plant stand.

Soil insects
This section contains images and information kindly supplied by QDAFF.
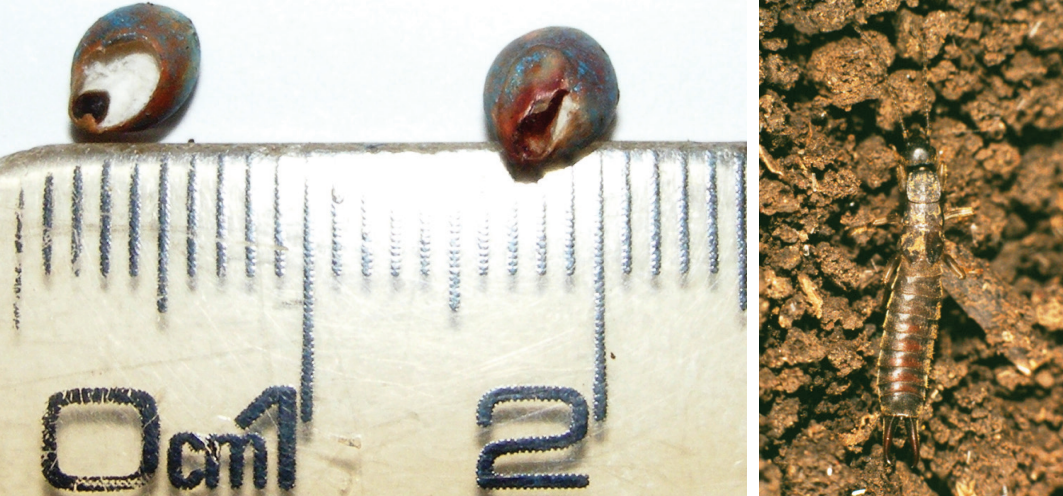
Black field earwig
Black earwigs (Nala lividipes) are sporadic but potentially major pests of grain sorghum. They eat newly sown and germinating seed as well as the roots of crops resulting in poor establishment. Feeding on secondary roots may cause plants to fall over as they get larger. Serious damage is usually confined to soils that retain moisture well, and earwigs prefer cultivated soils rather than undisturbed soil (zero till).
It is important to monitor crops after planting and through establishment. Dig and sieve soil to detect adults and nymphs prior to planting. Use germinating seed baits and control if more than 50 earwigs in 20 germinating seed baits. Insecticide seed dressings provide some protection however grain baits containing insecticide applied at sowing offer the best protection. The use of press wheels at sowing can also help. In furrow sprays are not effective in protecting against dense populations.
Right:
Black field earwigs (Nala lividipes) are most commonly found on soils with a high water holding capacity. The adults and nymphs feed on seedlings, causing their most severe damage by attacking the roots of young plants and prop roots of older plants. This damage has been shown to often cause crop lodging (NSW DPI, 2005).
Left:
Earwig damage to grain sorghum seed.
True wireworm
True wireworm (Agrypnus sp.) larvae bore into germinating seed and chew on seedling roots and shoots resulting in reduced vigour, wilting or seedling death. Damage is worse when crop growth is retarded by dry, wet or cool conditions. Wireworms generally favour moist areas. True wireworm larvae may also feed on helicoverpa pupae.
To detect larvae prior to sowing, use germinating seed baits or soil sampling. Monitor crops after sowing and through establishment. One larvae/germinating seed bait warrants control. Seed dressings, in-furrow sprays and granular insecticides offer some control.
False wireworm
False wireworm (Gonocephalum spp. and Pterohelaeus spp.) larvae attack germinating seeds and seedling roots and shoots in spring, resulting in patchy stands. Damage is most common in early planted crops with low crop residue. Adults may damage summer seedlings by chewing at or above ground level and replanting may be required.
To detect, either hand sift 10 soil samples (30 x 30 cm) or place 10 germinating seed baits throughout the paddock. One larva per sample (or germinating seed bait) warrants control.
Prepare ground for even and rapid germination. Use of press wheels at planting provides some control. For larvae, use seed treatments or in-furrow sprays. For adults, use cracked grain baits. Natural enemies provide little control. Infestations detected after crop emergence cannot be controlled.
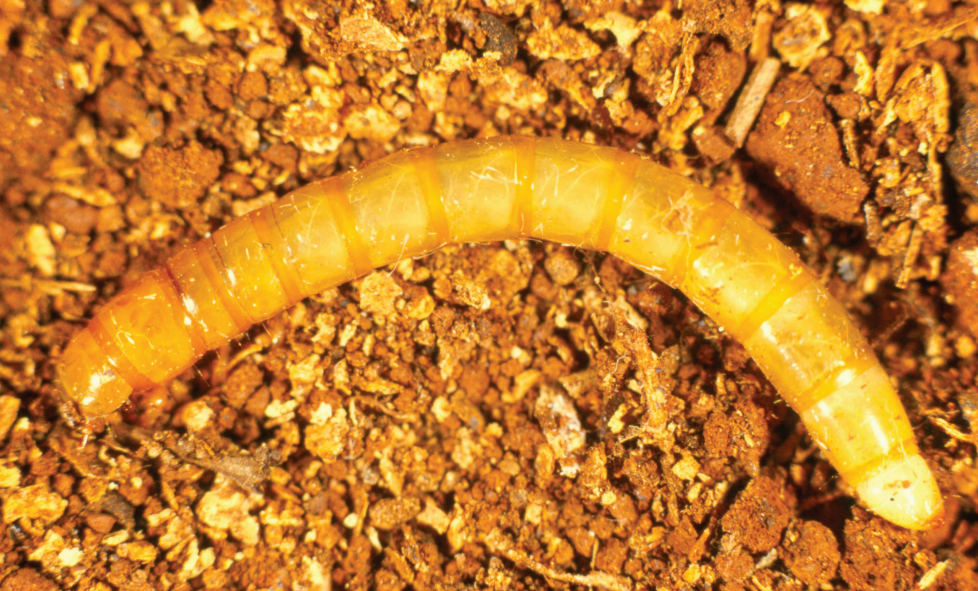
According to the New South Wales Department of Primary Industries (NSW DPI) (2011) true and false wireworms (Orondina spp.) feed on the seed, roots and seedling stems of emerging crops often severely impacting upon crop establishment.
Cutworm
Cutworm (Agrotis spp.) larvae feed on leaves and stems of young plants, and ‘cut´ down plants to eat the leaves. Partial damage to stems may cause the plant to wilt. Larvae shelter in the soil during the day and curl into a ´C´ shape when disturbed.
Cutworms are found in all soil types and often move into crops from adjoining fence lines, pastures or weedy fallows. Crop areas attacked by cutworms tend to be patchy and the highest risk period is during summer and spring.
Inspect emerging seedlings twice per week, particularly in higher risk situations. Treat seedlings when there is a rapidly increasing area of infestation or proportion of crop damage (>10% seedling loss). Increasing infestations occur where larvae move from weeds or weedy field edges. Treat older plants if more than 90% of samples (9 out of 10) have 1 or more cutworms or when plants have 75% or more leaf tissue loss. Spot treatments (e.g. along field edges) may be successful. Spray late in the afternoon to increase the likelihood of contact with feeding caterpillars (dusk-night).
Keep fallows clean and eliminate weeds from paddock perimeters at least one month before planting. Severe damage to emerging crop can occur when large larvae are forced to move from weed hosts into the crop following spraying of the weeds. Cutworms are attacked by a range of natural enemies such as parasitoids, predators and diseases.
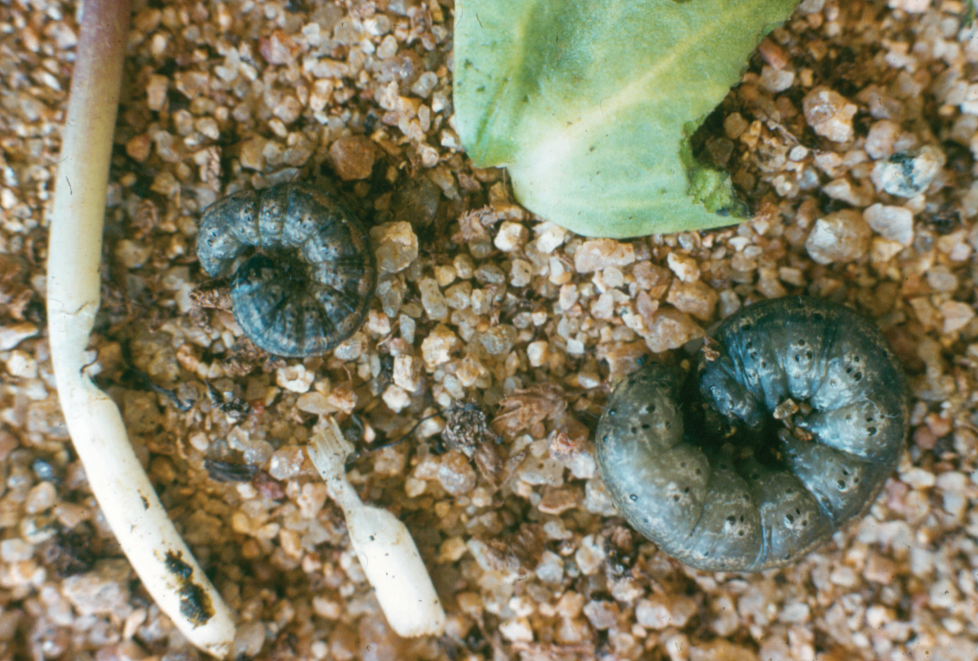
Cutworms (Agrotis spp.) reduce plant stands by feeding on the leaves and stems of young, emerging seedlings. This can lead to seedling death or damage with symptoms usually appearing in patches across paddocks (NSW DPI, 2005). Pictured are Cutworm larvae.
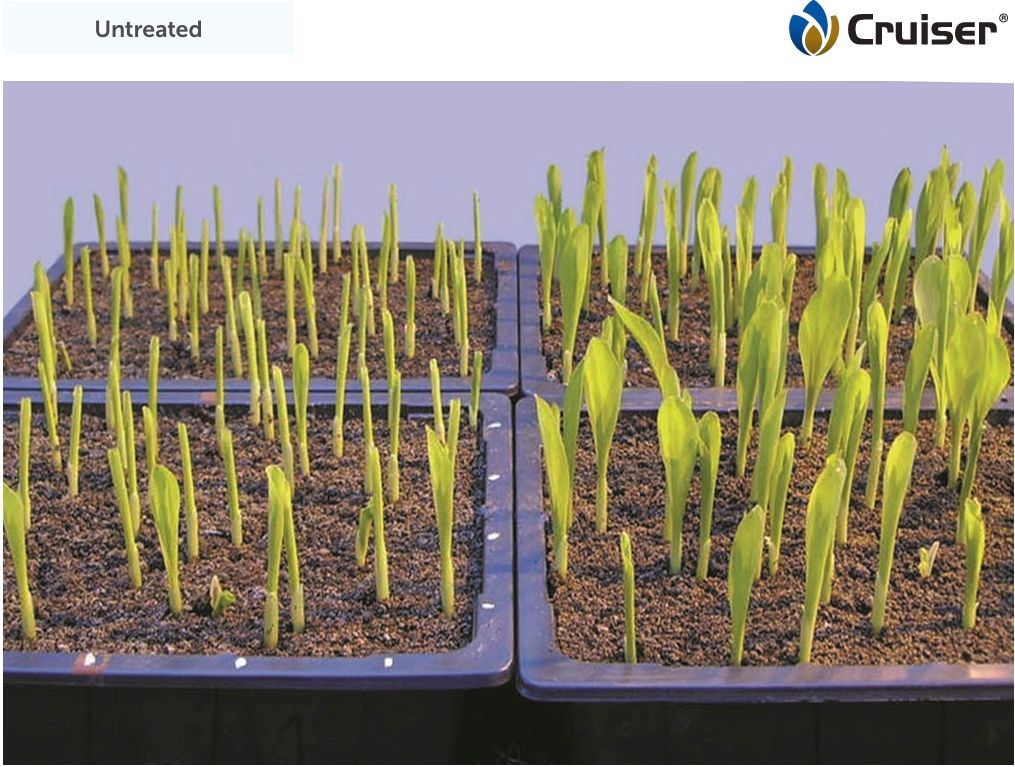
Soil insect pests can cause significant establishment losses in grain sorghum crops. Today, almost 95% of all grain sorghum planted will be treated with an Insecticide. Pacific Seeds grain sorghum hybrids are treated with Cruiser® 600FS which belongs to the 4A group of insecticides. Cruiser® 600FS controls the following insect pests:
- Eastern False Wire Worm
- Southern False Wire Worm
- Sugarcane (True) Wire Worm
- Black Field Earwig
- Corn Aphid (early growth stages only)
Pacific Seeds Grain sorghum hybrids are treated with Cruiser® for both insect protection and for the increased seedling vigour it provides.
In most situations, seed treated with an insecticide will give excellent control of the labelled pests, however when planting under less than ideal germination conditions or with extreme pest pressure significant seeding losses can occur.
Cool soils will slow down the germination and emergence of seedling sorghum. Average soil temperatures below 16°C increase the time taken for emergence therefore exposing the developing embryo to soil pests for longer.
As different insects require different control measures, the species of soil insects must be identified before planting. Insect sampling and identification methods include:
Soil sampling by spade

Germinating seed bait technique
Immediately following planting rain:
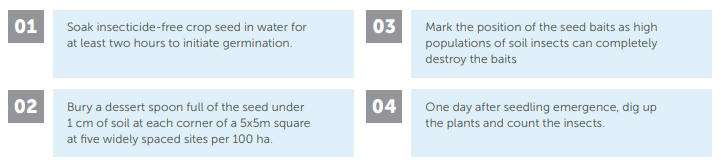
The major disadvantage of the germinating grain bait method is the delay between the seed placement and assessment. Trials have shown that there is no difference in the type of seed used when it comes to attracting soil-dwelling insects. However, using the type of seed to be sown as a crop is likely to indicate the species of pests which could damage that crop.
Alternative methods of soil insect control
Alternative methods of soil insect control include grain baiting and in-furrow sprays. Lorsban® is commonly used on non-treated or standard seed and applied in-furrow. Please note applications of this insecticide should never be applied to seed treated with Cruiser® or a combination of Cruiser® and Concept II®. It is also worth bearing in mind that applications of other furrow applied products with treated grain sorghum seed can have negative impacts on germination and emergence and may also void any seed warranty offered.
Different species of soil insects appear under different cultivation systems and farm management can directly influence the type and number of these pests present. Please note:
- Weedy fallows and volunteer crops encourage soil insect build-up.
- Insect numbers decline during a clean long fallow due to lack of food.
- Summer cereals followed by volunteer winter crops promote the build-up of earwigs and crickets.
- High stubble levels on the soil surface can promote some soil insects due to there being a food source but this can also mean that pests continue feeding on the stubble instead of germinating crops.
- Zero tillage encourages beneficial predatory insects and earthworms.
- Incorporating stubble promotes black field earwig populations.
- False wireworms are found under all intensities of cultivation but decline if stubble levels are very low.
Seedling diseases and disorders
Seedling diseases such as Fusarium and Pythium most commonly appear in seasons which begin with wet starts. The temperatures at planting usually play a significant role in which of these pathogens could appear. However it is also possible that in some circumstances both may be present and damaging the crop simultaneously. Infections of Fusarium in the seedling stage commonly occur with warm and wet conditions at, or just after planting. The impacts of Fusarium during the seedling stage include root damage in the form of rot which causes reductions to plant growth and overall plant stand.
Pythium species are fungi which attack and rot the roots of seedlings. Symptoms of pythium presence typically include root damage causing seedlings to display poor vigour and in serious cases seedling death if the damaged roots cannot be replaced quickly enough. Conditions which favour Pythium development are usually cool and wet conditions at, or just after planting.
The impacts of seedling disease can be minimised by only planting seed that has been treated with a fungicide and ensuring soil temperature requirements have been met prior to beginning planting to ensure swift seedling emergence.
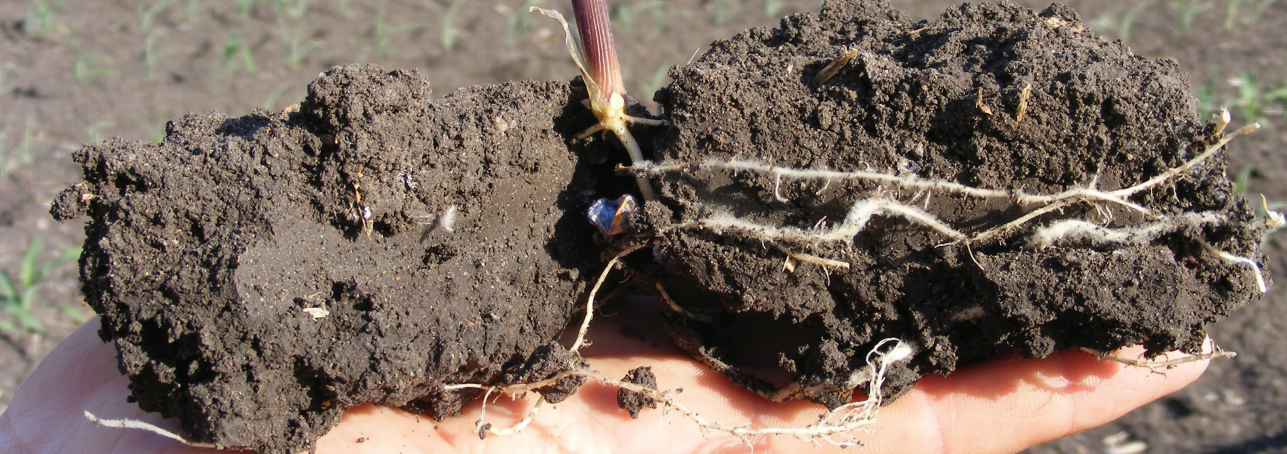
Long fallow disorder is a consequence of a very long fallow period reducing or completely removing vesicular arbuscular mycorrhizae (VAM) from the soil. The absence of VAM at adequate levels prevents the efficient uptake and use of nutrients, in particular Phosphorus and Zinc. This results in unthrifty plant growth with plants seemingly remaining in their seedling stages for weeks even where soil moisture is plentiful (DAFF, QLD, 2010).
To combat the effects of long fallow disorder, where possible growers should try to keep fallow length to within twelve months, ensure the use of fertilisers containing Phosphorus and Zinc are applied at planting and if they believe they could be in a low VAM situation seek advice as to the best rotational choices to minimise negative effects.

Corn seedlings following flooding displaying damage from Pythium.
Seed spacing table
Row crop population calculator: Distance between seeds